Contacts
Contacts in OnPage represent individual users who can receive messages, alerts, and notifications. Each contact has specific attributes that can be managed through the OnPage interface.
Creating a Contact
- Navigate to the Contacts tab.
- Click Create Contact.

- Fill in the required fields:
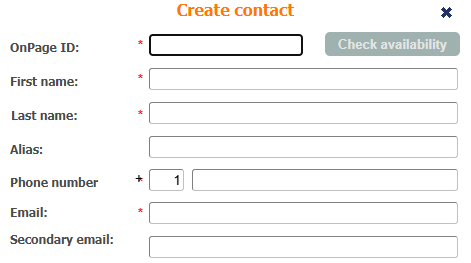
- OnPage ID (Unique identifier for the contact)
- First Name
- Last Name
- Alias (Optional display name)
- Phone Number
- Groups (Assign the contact to one or multiple groups)
- Configure additional settings:
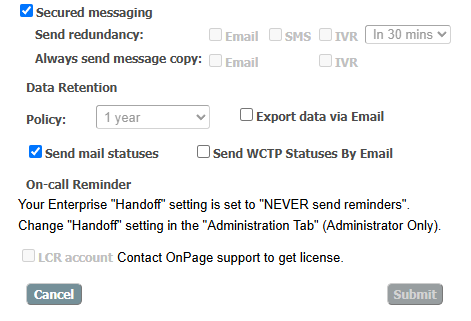
- Secure Messaging: Enables encrypted messaging for the contact.
- If you attempt to disable secure messaging, a confirmation prompt appears stating: “If you are a healthcare customer, a redundancy to IVR, email, or SMS is not HIPAA compliant.” Users must acknowledge this warning before proceeding.
- Send Redundancy: Options to send messages via Email, SMS, IVR with a configurable delay (e.g., in 30 minutes).
- Always Send Message Copy: Ensures a copy of messages is always sent via Email or IVR.
- Data Retention Policy: Allows selection of a retention period:
- Read/Receipt
- 1 Month
- 6 Months
- 1 Year
- Unlimited
- Export Data via Email: Provides an option to export all communication data via email.
- Send Mail Statuses: Enables notifications regarding message delivery statuses.
- Send WCTP Statuses By Email: Allows users to receive Web Call Transport Protocol status notifications.
- Secure Messaging: Enables encrypted messaging for the contact.
- Click Submit to save the contact.
Managing Contacts
- Contacts can be edited or removed by either doubling clicking on the contact or selecting it and using the Remove Contacts button.
- The contact list displays online/offline status, alias, email, phone number, and assigned groups.
- You can search for contacts using the Search bar at the top.
- Bulk contact upload is available via the Upload Contacts option.
Bulk Uploading Contacts
- Navigate to the Upload Contacts section.
- Prepare a CSV file with the following comma-delimited fields:
- First Name (Required)
- Last Name (Required)
- Email Address (Required)
- Phone Number
- OPID (Optional, auto-generated if empty)
- Secondary Email
- Email Redundancy (true or 1 to enable)
- Email Message Copy (true or 1 to enable)
- Send Mail Statuses (true or 1 to enable)
- If OPID is not provided, it will be automatically generated using:
- Account first name, last name, and optional prefix, pre-suffix, and suffix values.
- Upload the CSV file and click Next to review.
- Confirm the details and proceed to import the contacts.
Groups
Groups allow users to categorize contacts for streamlined messaging and escalation processes. OnPage IDs for groups are automatically generated based on the group name. If the group name is shorter than 7 characters, additional characters will be added automatically. Once a group is created, you can click or double-click on it to view the generated OnPage ID.
Creating a Group
- Navigate to the Contacts tab.
- Click Create Group.
- Enter the following details:
- Name (Unique identifier for the group)
- Description (Optional group details)
- (Optional) Enable Escalation for failover messaging.
- Configure escalation settings:
- Failover Interval: Determines the time between escalation attempts.
- Failover Factor: Defines the escalation trigger based on the following factors:
- Delivered: Message must be delivered before escalation occurs.
- Read: Message must be read before escalation occurs.
- Replied: Message must be replied to before escalation occurs.
- Failover OPIDs: Specifies the contacts or groups to receive escalated messages.
- Specify additional settings:
- Fail Report Email: Designates an email address to receive failure notifications.
- Include Original Message: Ensures the original message content is included in fail reports.
- Click Submit to create the group.
Managing Groups
- Groups can be edited or deleted from the Contacts tab.
- Contacts can be assigned to or removed from groups as needed.
- Escalation rules can be adjusted to ensure proper alert handling.
Best Practices
- Use Groups to organize contacts based on roles, teams, or escalation levels.
- Enable Escalation for critical alerts requiring redundancy.
- Ensure contacts have updated phone numbers and email addresses.
- Regularly review and update group assignments to reflect organizational changes.
- Utilize Secure Messaging for sensitive communication.
- Set Failover Intervals and Factors carefully to optimize response times.